SEM/STEM SI Setup
Microscope setup (TEM only)
Set up the microscope in scanning mode. Refer to your microscope manufacturer's user manual for details.
Configure the spectrum imaging technique
 Within the DigitalMicrograph® software, go to the Spectrum Imaging or STEM SI technique, then open the palettes you require for the experiment:
- Scan – Controls the DigiScan™ system
- SI Acquisition or STEM SI – Defines the spectrum imaging (SI) acquisition
- Relevant signal acquisition palettes for each available signal
- Additional data analysis palettes for the available signals
SI Acquisition or STEM SI palette
 The SI Acquisition and STEM SI palettes enable the setup and control of your SI experiment on the SEM and TEM, respectively. If no STEM SI experiment is currently set up, the palette appears in a mode selection state. Brief descriptions of the dialog features are given below.
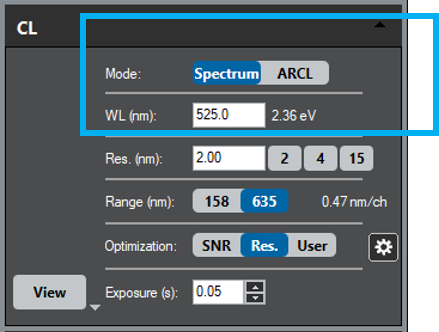
In some models of the Monarc® system, more than one acquisition mode is available within the SI workflow. In the CL palette, select the Spectrum or ARCL mode to collect a (wavelength) spectroscopy SI or an angle-resolved SI, respectively.
Signal selection
 The top section of the palette features a button for each available signal in the SI experiment (e.g., CL, EDS, EELS, and CBED) and an icon to allow simultaneous capture of other DigiScan signals (e.g., SE-BSE). For each signal selected, the appropriate acquisition palette automatically expands or collapses and may trigger requests to change the microscope state as necessary. At least one signal (besides the Scan button) must be selected, or the SI experiment cannot start.
Note: Some signals are mutually exclusive. Selecting such a signal will automatically deselect the other.
Mode selection
Use the palette's bottom section to set up the spatial coordinates of the SI. Pressing a mode button (2D Array, Line Scan, Multi-Point, and Time Series) will automatically assign a suitable survey image and create a default SI survey region of interest (ROI) marker. A Preview type acquisition is automatically started and assigned if no suitable image is available.
- 2D Array – Regular 2D SI that consists of an array of equally spaced points in X and Y
- Line Scan – 1D SI that includes an array of equally spaced points along a line
- Multi-Point – Acquires a set of point spectra with identical parameters from individual spatial positions and collects them into a 1D SI data container
- Time Series – Sequentially acquires a set of spectra with identical parameters from the identical sample area and collects them in a 1D SI data container
After choosing your signal and mode, a new palette is available. The palette includes:
- Capture – Starts a new SI acquisition using the specified parameters
- Pixel Time (s) – Specifies the beam's pixel dwell time and applies it to all spectral acquisition with the permitted values restricted to the minimum and maximum readout times of the selected detectors
Note: The acquisition time estimate automatically updates when you change the dwell time.
- Live – Activates (blue) or deactivates (gray) live data display during SI acquisition
- Drift – Activates (blue) or deactivates (gray) spatial drift correction
 The bottom parameters (boxed-in portion of the image) dictate the specific modes of capture per the selection made in the STEM SI palette. The options available are dependent on the mode that was selected there; the options include:
2D Array
- Size – Specify the size of the SI in pixels by using the Width and Height fields
The size automatically updates if you change the SI survey ROI position on the active survey image. Changing the Width value automatically adjusts the sampling resolution while keeping the acquired region the same. A change in Height changes the aspect ratio and, hence, the acquired region of the SI while keeping the sampling resolution identical.
Note: The acquisition time estimate automatically updates when the size is changed.
Line Scan
 Size – Specify the line scan Length in pixels
The sampling resolution automatically updates when the size is changed. Step displays the current sampling resolution in calibrated units. The SI size in pixels updates automatically when the sampling resolution changes, keeping the acquired scan length identical.
- Average dose – Enables the averaged line scan functionality and is not available for all systems and settings
Multi-Point
 No. positions – Allows you to specify the SI size in the number of individual positions
The number of survey ROI point markers is updated accordingly.
Note: You need to specify at least 2 points before the SI acquisition can start.
- Arrange position – Click these buttons to arrange (selected) positions in various ways over the field of view
Time Series
 Repeats – Allows you to specify the SI size in the number of individual acquisitions
Note: You need to specify at least 2 repeats before the SI acquisition can start.
- Delay (s) – Where you specify a pause in between two successive acquisitions
During these pauses, the signal controllers stop, and the beam control releases to the default. The acquisition is then in an idle state similar to a paused acquisition, but it displays a countdown at the bottom of the STEM SI palette. The next spectrum is automatically started at the end of the countdown acquisition.
- 2D Scan – If left unchecked, the spectra will be acquired from a stationary position as indicated by an ROI point marker in the survey image
If checked, it acquires spectra rapidly and repeatedly scans a specified area. The ROI rectangle represents the area in the survey image, and the two fields below the checkbox define sampling for this area. Enter values to change the area size or use the up and down arrows to change the sampling density of the area.